Hooked Rug Pillow Finishing - Just One Way
When I first started making pillows, I was intimidated by the finishing process because I was not the most skilled person at hand sewing, but I found it to be much easier than I expected. I took some photos of one of my earliest pillow projects just to document how I personally am finishing pillows these days. I know there are many other ways, but I find this to be really simple and my customers really like the results. Here is the finished pillow:
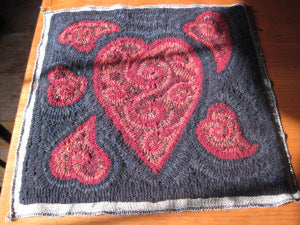
 And here is the hooked piece - 15" x 15" - from which it was made:
 (Editing note: I have since found this next step to be optional - do what works best for you!) The first thing I did was press back the edges so that they would lie flat against the back of the piece, with the aid of a damp washcloth, just as you would when you are steaming your finished mats:

 Once pressed, I put the hooked part on to the backing I want to use. For some pillows I use quilting cotton for the backs. For this piece, my customer wanted hounds tooth check wool. I place the hooked piece over the backing and then cut the backing approximately the size of the piece plus the serged edge.

 You will want to have the right side of the backing positioned so that it's on the "outside" - just as the pillow will be when finished. I then pin it in to place. With the hounds tooth check it was very easy to keep everything nice and square, because when I started stitching I just picked a stripe and followed it. My previous project had a paisley back, which is more forgiving in terms of angle of application to the back.
 Now comes the part where you really have to decide what's most comfortable for you. I turn the pillow "case" face up and stitch from the top side, folding the back fabric in and using the same stitch I would use if putting on a corded wool or cotton tape binding. I also start somewhere pretty far down on a side, go up over the top, and then back down to the bottom, which, of course, I leave open to stuff. I miter the corners as needed as I go around. You will find that your stitches are invisible, or very nearly so, using this method:

 Once you get to the bottom, you may fill the pillow with whatever you'd like for stuffing. I have been using pre-made pillow forms. In this particular case I used a 16" x 16" pillow form in my 15" x 15" case - it made for a nice fluffy pillow. When you have your stuffing positioned the way you want it inside the pillow, you are now ready to just stitch the bottom shut. This can be challenging if your pillow is really full, but yes, you'll get through it!

 Here is a blue version with paisley I finished about a week or so ago:


 I hope this helps for those of you new to pillows to see how easy this can be. You can do cording and other methods, but I really like this because it makes the entire front of the pillow hooked, and actually involves less hand sewing than you would do on a typical mat binding.
Happy hooking and please share your ideas and photos with us! ~ Beth
I hope this helps for those of you new to pillows to see how easy this can be. You can do cording and other methods, but I really like this because it makes the entire front of the pillow hooked, and actually involves less hand sewing than you would do on a typical mat binding.
Happy hooking and please share your ideas and photos with us! ~ Beth


- Parris House Wool Works
Comments 1
TERESA F KELLEY
I think I might actually be able to finish the rug hooking pillow by following your directions. Thank you, your instructions on how-to are simple to understand for which I am very grateful. Hoping for the best.